Before I moved into this house, we lived in a house that I didn’t love. It wasn’t my style and it was definitely temporary until we found the right one. During these 2.5 years of in between life I was on a decorating strike. I would decorate the bare minimum that I had for each holiday because I just refused to buy a bunch of decorations for a place that I knew wasn’t home. Yeah yeah yeah, Mom of the year, I know. But the whole time I kept promising my kids when we moved into our home home, that we would do it big for each holiday.

Our first Christmas had to be the best. Cute, trendy, perfect. I needed to spend tons of money on decorations to cover every inch of the house! I couldn’t let the kids down, ya know?! Buuuuut then that frugal side kicks in that I am always telling you guys about. How can I have the best of both worlds?
NATURE! That is how! So while looking at trendy decorations, I came across these pinecone set ups.. oh my sweet baby Santa – I’ve gotta have it! Guess what? Pinecones are a free gift from nature!


So here is how I created my favorite decoration!
Step 1: Find them
Added bonus, as a family we took several walks throughout November and collected pinecones for my projects. This was the fun and easy part. When you are picking out your favorite gems laying on the ground beneath the pine trees- don’t be picky! They don’t need to be opened yet, they can be closed, they can be grey, brown, or dirty. Once you get them home- think twice before taking them inside. It shouldn’t have been a shock, but they have bugs in them. Letting them sit out will allow some tiny bugs to run away before you literally cook them.
Step 2: Cook them
It’s important not to skip this step! These little sweet seeds of joy come with all kinds of tiny friends. In order to ensure you are not infesting your house with said friends, cook the cones. Another benefit of cooking your cones is to open them up. You want them nice and full.

It’s simple – just heat the oven to 275, lay them on a foiled baking sheet. I cooked mine for 10 min intervals checking on them. You will slowly see the closed ones starting to open. The ones that were already open will continue to open and start bending back if you keep them in there too long. So feel free to open it up and pull out the ones that are already at your desired state. Leave the rest and keep checking on them. You will notice as they dry off you can simply shake off any dirt/sand. This will make your next step easy.
Step 3: Frost them
Adding “snow” can be done in many ways. I used Epsom salt since I had an excess in the house already. Feel free to use fake snow, or other frosting methods in its place.

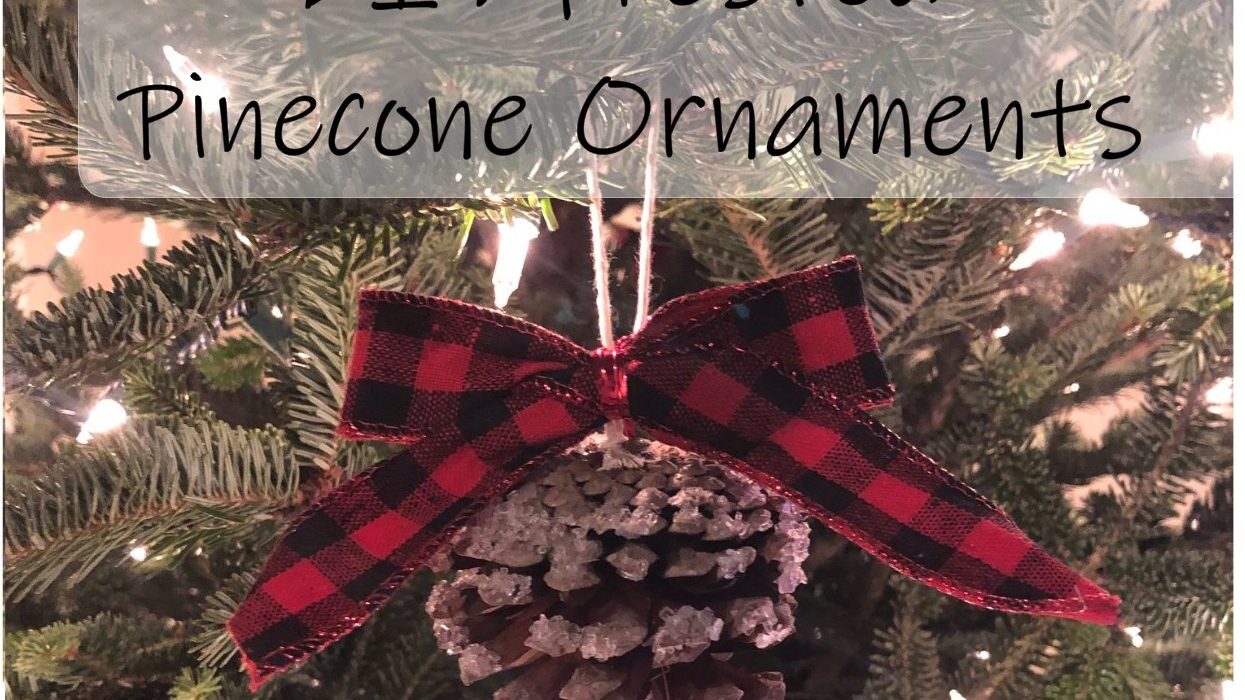
This is the part to call the kids over for, as long as you don’t mind them getting messy with some Elmer’s glue. I held the pinecone bottom side up, and put random amounts of Elmer’s glue all around the top half. I wanted to give it the effect as if snow had fallen from the sky and landed on the upside down pinecone. While the glue is still wet, simply roll it, dip it, or shake it in the Epsom salt. Set it aside to dry. This will look pretty messy but do not worry- the Elmer’s glue will dry clear and the salt will sparkle!
Finally: Fancy them up!
Gluing a simple string to the top and hanging them up may be all your tree needs. My tree was very simple and only had white lights and the pinecones so I took it one step closer to fancy and added these pre-made buffalo plaid bows that I found at my local dollar store. All I had to do was twist tie them on. You may be the make your own bow type, but I can’t tie a bow to safe my life, so thank you Dollar General for saving the day!
Here is the final product:


From our family to yours, Merry Christmas!