One of my favorite activities is repurposing literally anything. It’s frugal and just cool to envision something different out of something you already have! Several years ago I came across this beautiful Pinterest inspiration of repurposing a frame into recycled wood farmhouse décor. It was before it became a large trend and stores were selling these types of wood pictures for much cheaper. Still not cheap enough for me.. lol.

I happened to have a large frame that was handed down to me, its solid wood, a great piece that I had previously already repurposed to holding photos on wire lines. Note: beware of the crazy bold green color.. I have always been a little out there.
So it was time for an upgrade. I had to have this wooden sign.. there were not any tutorials out there because it was a sign being sold. It looked easy enough so I just started painting. I ended up using 3 colors of chalk paint. The brand I used was “DIY” and it was sold at a local antique shop. However, if you are not able to find that brand, I have also used for other projects the Rust-oleum brand and am very impressed. For this particular project I wouldn’t use spray paint because you are looking for that aged/brushed look which just can’t be achieved with spray paint.
Paint colors I used:
- Rust-oleum Chalked Linen White– First layer & some boards inside
- Rust-oleum Chalked Country Gray– Aged technique on frame & boards inside
- Rust-oleum Chalked Turquoise– Accent for boards inside only
- Rust-oleum Chalked Matte Clear – Clear coat after to add protection
Inside boards:
I used all random extra wood pieces that I had around my house. Some pieces were extra base boards, some were random plywood pieces from old hurricane shutters. I simply placed them randomly and if together they were all too long – I would cut some shorter. You want them to look mixed matched – don’t be too perfect at this part. Be sure when you are cutting the length that you are getting a nice tight fit.


Once you have your cut pieces of wood. You can decide which pattern of paint you want to do. This is where you can get super creative. Do you want more of one color? What accent color do you want? For mine I used whites and grey with an accent color of Turquoise. Whatever you pick, just do 1-2 LIGHT coats. You wanted it to be faded in some spaces. If you make it perfect, it wont look as good. Tip: If your color comes out too much of a solid, use a white or grey over top of the color in some spots to give it an aged look.
Paint your Frame:


I did my frame white and then lightly went over some of the edging spots with the country grey to give it an antique look. This looks much better when you have a frame that has detail around the edges.


If you are getting stuck on the antique step- don’t worry. I have added a resource below to help you with some different techniques that you may like better.
Tutorials: The 3 most popular techniques for distressing furniture
Attach the Boards
For this part you need to channel your inner 5 year old cause we are about to get glue everywhere! I used Gorilla Glue for my project, but as long as you have a strong glue- wood glue, super glue. Whatever holds well- you should be good. Remember this is hanging on the wall and not being used as a table etc. Since I had a nice tight fit of my wood length I simply laid one board at a time gluing all parts that touch my frame. I wasn’t being frugal in this area either since my glue dried clear- I knew no matter how much I added you wouldn’t see it.

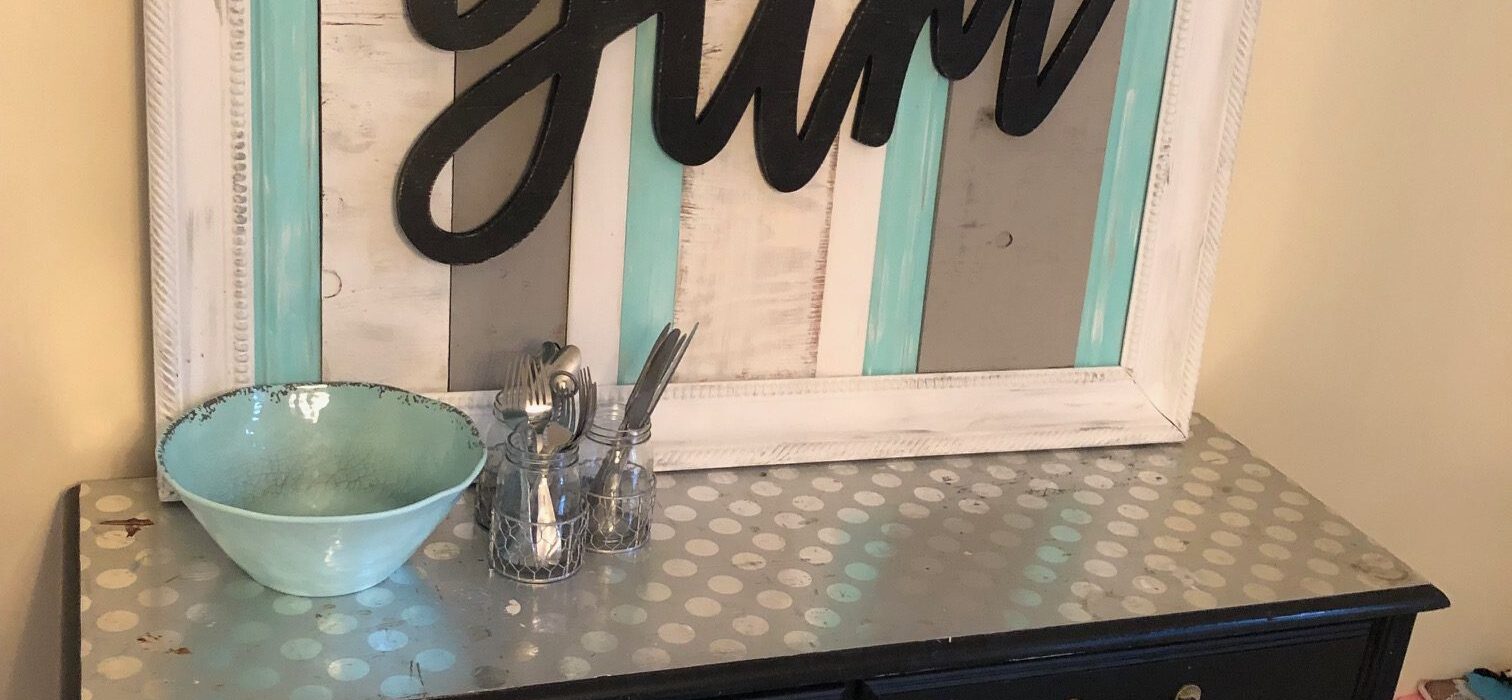
Find your Wood Word
I originally planned to use Family as my word however when I went to Hobby Lobby, the only word that they had on sale was “Yum”. I probably walked past it about 6 times before coming back and making it work in my head. My frame was going in my dining room.. and I definitely wanted it to be different. The size was perfect… Ok I got it! 🙂
To attach it since the background is wood it was very easy. I got small finish nails and lightly tapped in a few around the sign with a hammer (while I had it laying on the floor) they stick out of the wood background and hold the “Yum” in about 3 key spots. I can remove it if I want to change the word in the future as well :).


There you have it. Your finished product! I hope you love yours as much as I love mine!